Headlines
Headlines are quick updates that keep your team informed and aligned. Use them to share wins, news, or anything worth celebrating. You can share them with your team or use cascading messages to share company-wide.
Add a headline
You can add a headline directly from your Dashboard by clicking the + button in the My headlines section.

You can also go to the headlines option in the sidebar and click the Add headline button at the top right. If you are adding your first headline you will also see a prompt in the centre of the screen with an Add headline button.

You will then see a popup where you can add the headline, an optional description, the team you want the headline to be for and the owner of the headline.

The headline will default to the status of Not shared and you can update it to the status of shared once it has been discussed in your meeting.
You will also see the option to make the headline a cascading message. This will send the headline out to all teams across your company and will be displayed in everyones dashboard and in all teams meetings.
The 'Create more' button allows you to add additional headlines without closing the window. After saving a headline, the pop-up remains on your screen so you can continue creating more headlines seamlessly.
Cascading Headlines
Creating a Cascading Headline - Once the Cascading Message button is turned on, click the Team dropdown. You’ll then have the option to select the teams you’d like the headline to appear in
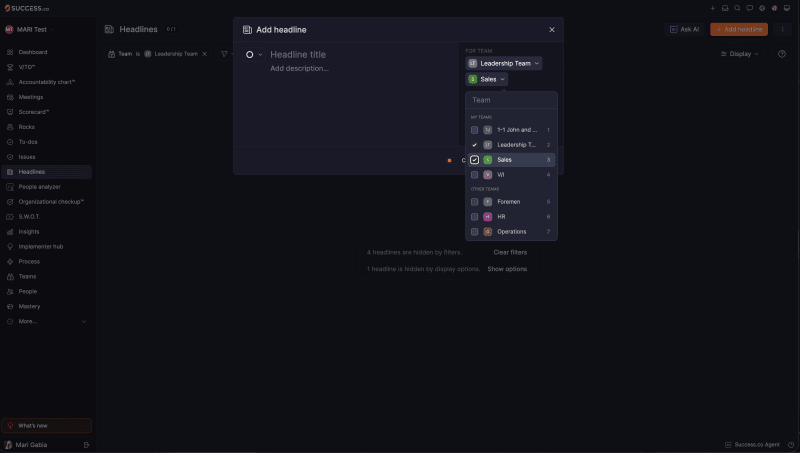
Making an Existing Headline Cascading
To make an existing Headline cascading, go to the Headline Overview or select the three-dot icon, then select Make Cascading.

Once Cascading Message is turned on, select the teams you’d like the Headline to appear in, then click Send.

Add an issue
To add an issue from a headline you can use the three dots icon on the headline in the list or go into the headline and use the three dot icon at the top right of the screen.
Click the Raise issue option in the menu.
You will then see a popup, there is also an optional description to add more information and you can select if this is a short term or long term issue.
The team and owner of the issue will populate with the person creating the issue on the right hand side, these can be updated to another team or owner if required. You can also allocate the priority level from the dropdown.
Once you click the Add issue button the issue will be added to the short-term or long-term issues list for the team and owner.

Add a to-do
To add a to-do from a headline you can use the three dots icon on the headline in the list or go into the headline and use the three dot icon at the top right of the screen.
Click the Add to-do button in the menu options.
You will then see a popup. You can add a title, description, set the due date, select a team, assign the owner, set a priority and add attachments. If you wish to assign the to-do to multiple user, you can turn on the 'choose multiple' button form the owner dropdown.
Once you click the Add to-do button the to-do will be added to the to-do list for the team and owner or just the owner if it's a private to-do.
The 'Create more' button allows you to add additional Issues without closing the window. After saving an Issue, the pop-up remains on your screen so you can continue creating more Issues seamlessly.

Display settings
In the display settings menu at the top right of the headlines screen you have the option to display Discussed Headlines or the change the Display Order.
Discussed Headlines
This will show the discussed headlines that have been updated to status of Shared within the time frame you have chosen. You can choose from the following options:
- Hide all
- Show past day
- Show past week
- Show past month
- Show past year
- Show all

Display order
In the display settings you can also update the display order to the following options:
- Title (alphabetical A-Z)
- People (alphabetical A-Z)
- Date created
- Manual (allows you to drag and drop the order)

Create Headlines by Email
Success.co allows you to create Headlines by sending an email directly to a team-specific email address.
Who can change this setting
- Only users with Admin level access and Managers can turn Create headlines by email on or off and regenerate the email address.
- Team Members can copy the email address once the setting is on.
- Observers have no access to this setting.
This is a Team setting, not a personal one. When an Admin or Manager turns it on, it works for everyone on that Team, so each person doesn't need to turn it on for themselves.
Step 1: Enable Create Headlines by Email
- Select Teams from the left-hand sidebar.
- Select the Team where you want the Headline to be created.
- Click the Settings tab within the Team.
- Under Inbound email, locate Create headlines by email.
- Turn the Create headlines by email toggle ON.
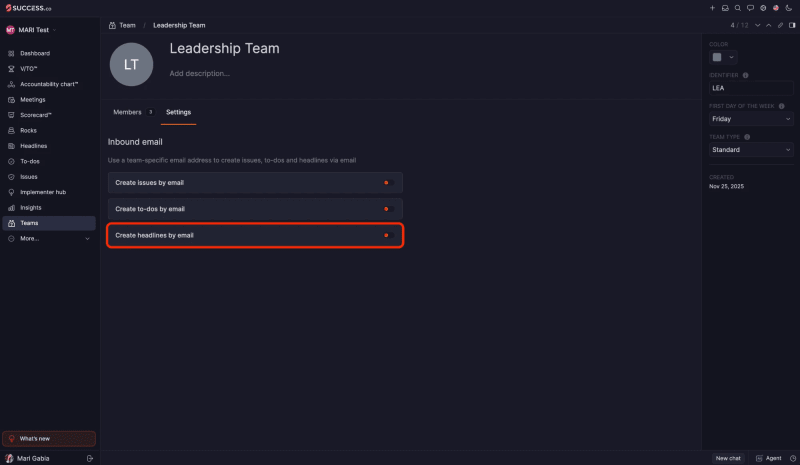
Step 2: Copy the Team's Headline Email Address
Once Create headlines by email is turned on, a unique email address for that Team will appear underneath the setting.
Click the Copy icon next to the email address to copy it or click on the Regenerate icon to generate a new email address.
Note: Each Team has its own unique Headline email address. Make sure you're using the email address for the Team where you want the Headline to be created.
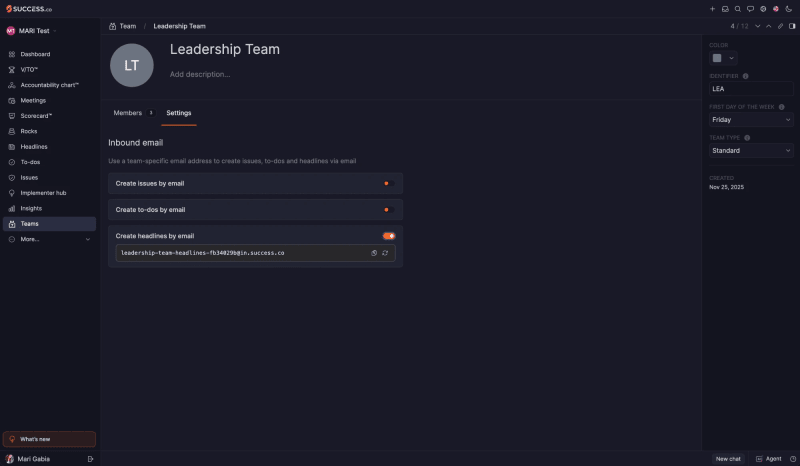
Step 3: Create and Send Your Email
Open your email provider and create a new email.
- In the To field, paste the Team's Headline email address.
- Enter the Headline you want to create in the email.
- Add any relevant information or details.
- Send the email.
Tip: You can save the Team's unique Headline email address as a contact in your email provider for quicker access in the future.